Tuesday, June 25, 2024

शरणागति


केवल श्रीकृष्ण के हो शरण में रहना है-जैसे अर्जुन... सोया रहा जब मिषम पितामह ने पाड़बों में किसी एक का वद्ध + with दुर्योधन को अखण्ड सौभाग्य वाती चिन्ता नहीं करनी - संसार में Duty करनी है - कत्ती पन का अधिकार त्यागने से ही - On this. of our ratio of शरणागति रूस जीव का योग (क्षेम बस्न करते है- हमें क ताप्‌न का अहंकार |

त्याना है < Predice it again and youn Remember चिता तो केवल सुत शरीर को जलाती है Whereas जबकि चिन्ता जीवित मनुष्य को ही जला fou चिन्ता most dangerous देती |


कृपालु इस अन- होनी हो ही नहीं सकती और होनी को कोई टाल नहीं सकता। फिर क्यों चिन्ता करते हो


अपने जीवन की डोर श्री उष्ण के हाथों में सौंप दाउन्ने, प्रारंणागता संसार में केवल कहि पातुन क्रो, करो स्वय का कही न माना + अपने गौतर कालीपन को अभिमान सर जैसे राह ऐऐसा होने पर कम बन्दान होता जाएगा गीता बात बनेगी नहीं गलित, निगड़‌ती जायगी


सही प्रशरणागति शरडा में जाना - केवल श्रीकृष्ण भगवान का ही आश्रय हा (अन्ना भी बाप गाई पहन अति पनिन को बाहर निकाल देना | श्रीकृष्‌ण का बल ही खदैन


साथ रहे-वस । अपने को श्री कृष्ण को सौंप देना है। अपनी व डोरी उनके हाथ देकर निছिন हो जाना है।


ga केवल भगवान का ही आश्रय हे केवल उन्के काल का ही हृदय में रखना


Friday, December 2, 2022

DataBases changes using Dacpac

 Objective

This Documentation will show to work the database used in database created, patterns used and how to connect to them in the three environments Dev, test and UAT.

 Tools

·        SGBD: SQL server

·        Cloud: Azure SQL Server

·        Designer: SQL Project (visual Studio)

·        view/Edit Data: Azure Data Studio / SSMS

Table structure

        CREATE TABLE [dbo].[Student]
        (
[Sno] [int] NOT NULL,
[Student_ID] Int NOT NULL,
[Student_name] [varchar](50) NOT NULL,
[Date_of_Birth] [datetime] NOT NULL,
[Weight] [int] NULL
        );

 As in the example above, every table must have an ID of type integer, which is the primary key of the Entity, this key must be automatically generated (identity).

Environments and how to connect with them

Azure data studio/ SQL server is used to the database and view and edit the data. the table below present the database

environment and URLs

Environment

SQL server

Database

dev

dev-001.databse.window.net

dev

How to connect

To connect the respective Environment, you have two options to connect one is through azure data studio, SSMS and server Explorer.

Through Azure Data Studio


Through SSMS


Through Server Explorer


How to Add/Edit

How to create/Edit Table 

To create a table, right click on the table folder → Add → Table. it will show two ways to edit the table, visually in table format, or in script format.

To edit a table, double click the corresponding script int the table section, it will show two ways to edit the table, visually in table format, or in script format. As shown below:


It is recommended to pay attention to the script, as it is where validations and revisions are carried out by the developers. Most important is to build your project, it will not give any error. Otherwise, the pipeline will fail.

How to create/Edit Store Procedure

To create a Store Procedure, right click on the Store Procedures folder → Add → Store Procedure. It will show in script format. You can write a script.

To edit a table, double click the corresponding script int the table section, it will show two ways to edit the table, visually in table format, or in script format. As shown below:

It is recommended to pay attention to the script, as it is where validations and revisions are carried out by the developers. Most important is to build your project, it will not give any error. Otherwise, the pipeline will fail.

To test the Procedure that it is giving the desired result, you can connect to the Predev Environment by using above mentioned detail to How to connect the database. After testing if everything looks fine you can push your changed in the featured branch.

How to create/Edit Functions

To create a Function, right click on the Function folder → Add → Function. It will show in script format. You can write a script.

To edit a table, double click the corresponding script int the table section, it will show in script format. As shown below:

It is recommended to pay attention to the script, as it is where validations and revisions are carried out by the developers. Most important is to build your project, it will not give any error. Otherwise, the pipeline will fail.

To test the Procedure that it is giving the desired result, you can connect to the Predev Environment by using above mentioned detail to How to connect the database. After testing if everything looks fine you can push your changed in the featured branch.

How to create/Edit Views

To create a Store Procedure, right click on the View folder → Add → View. It will show in script format. You can write a script.

To edit a view, double click the corresponding script in the view section, it will show in script format. As shown below:

It is recommended to pay attention to the script, as it is where validations and revisions are carried out by the developers. Most important is to build your project, it will not give any error. Otherwise, the pipeline will fail.

To test the Procedure that it is giving the desired result, you can connect to the Predev Environment by using above mentioned detail to How to connect the database. After testing if everything looks fine you can push your changed in the featured branch.

How to create/Edit Pre and Post Development Scripts

To create a Pre/Post development script right click on the Script folder → Add → Scripts. Select your desired script. It will show in script format. You can write a script.

To edit a Pre/Post development script, double click the corresponding script in the Script section, it will show in script format. As shown below:

It is recommended to pay attention to the script, as it is where validations and revisions are carried out by the developers. Most important is to build your project, it will not give any error. Otherwise, the pipeline will fail.

To test the Procedure that it is giving the desired result, you can connect to the Predev Environment by using above mentioned detail to How to connect the database. After testing if everything looks fine you can push your changed in the featured branch.

Push your Code

After making the changes in your feature branch, move up your feature branch and request a pull request to your feature branch. After team has reviewed it, and the pull request has been approved, it should be published to respective environment in azure.

How the pipeline will work is as shown below


Wednesday, November 30, 2022

Creating .dacpac file from SQL Server and creating Database Project With Visual Studio

Creating .dacpac file from SQL Server and creating Database Project With Visual Studio

In this article, I am going to explain about SQL Server Database Project available in Visual Studio. I will cover the following points,

  • What is .dacpac File
  • Creating the .dacpac file
  • Introduction of SQL Server Database Project.
  • Create New SQL Server Database Project.
  • Importing the .DACPAC file in Database Project.

Prerequisites

 Visual Studio and MS SQL Server/ Azure data studio.


What is Dacpac File  

A file with .dacpac which stands for for Data Tier AppliCation Package. This extension is a database file, created with Microsoft SQL Server data tier application, that contains the database model for representation of database objects. As it contains the complete model of the database, it is used to restore a database from the details available in the model. This will help inn database import and export operations. 

In simple word we can say data-tier application package in the form of window file containing all the data structure in a single unit.

What is the Purpose of the DACPAC file.

DACPAC helps the DBA and the developer to package   into a single unit . it will we handed over to the team member for deploying the database to the target environments in a manual ( hitting the target environment through visual studio / VS code) and automated manner (through azure pipeline or from GitHub pipeline).

How to create DACPAC file 

There are many options to create the DACPAC file but explaining 2 options from that :

  • Use SSMS
  • Use Visual Studio
  • Azure data studio

Creating DACPAC using SSMS

SQL Server Management Studio is a easy tools through which you can generate DACPAC.

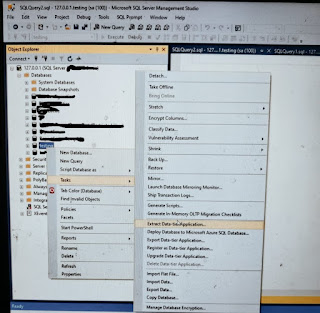
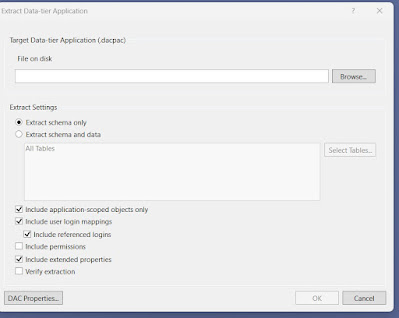
Open SSMS, right-click on database (in Object Explorer) and go to menu: Tasks -> Extract Data-tier Application 
For your reference adding the pictures also :-


Creating DACPAC from visual studio
it is the most best solution for creating the DACPAC file from Visual Studio we can change some configuration and create the dacpac file. Suppose we have some error in the database . some old Store procedure needs to be deleted using table old columns which was deleted recently . similarly Function, Views are using old column which was deleted recently. For those Scenario's we are taking the help of visual studio. 
By disabling that option you will avoid the issue and it doesn’t matter whether the database contains errors or not – the DAC package file will be generated.
Open extract window by using menu: View -> SQL Server Object Explorer, select required database and right-click on it and choice Extract Data-tier Application…


Creating DACPAC using Azure Data Studio
To create the DACPAC file from the azure data studio. Right-click the Databases folder or right-click a specific database in the Object Explorer. Then, select Data-tier Application Wizard


To create a new project and import existing database schema

To create a new project and import existing database schema

Click File àNew-à Project -à New Project dialog box à select SQL Server à SQL Server Database Project à Name the DataBase Project -àclick ok.


There is no specific platform for this project in previous versions of Visual Studio. You will be able to set your target platform in the Project Settings dialog box after the project has been created.

To Import the .DACPAC file into newly created Database

Right-click on Solution Explorer à Import à Database.


The Import Database dialog box opens. In the Source database connection section, click Choose a DACPAC file. The Import Database dialog shows a progress bar and displays a list of objects SSDT is importing. When the import operation has completed, click Finish to exit the final screen.


Examine the hierarchy in the Solution Explorer. Expand the dbo folder and you will find separate Functions, Tables and Views folders. Notice that the tables and function are grouped under their schema folders.


Now you can create any Tables, Store procedure , Function , View , Pre- development , Post -development scripts .. etc. from this database Project . After that push the code in the respective repository and push your changes in SQL database.


next Blog
https://ashissharma85.blogspot.com/2022/12/databases-changes-using-dacpac.html


Thursday, June 28, 2012

using CCAVENUE IN asp.net


<!DOCTYPE html PUBLIC "-//W3C//DTD XHTML 1.0 Transitional//EN" "http://www.w3.org/TR/xhtml1/DTD/xhtml1-transitional.dtd">

<html xmlns="http://www.w3.org/1999/xhtml">
<head runat="server">
    <title></title>
   
</head>
<body>
 <script src="http://cdn.webrupee.com/js" type="text/javascript"></script>
<form id="xx" runat="server" >
<div style="background:url(images/bg.jpg) repeat-x #FFFFFF left top; height:200px; width:100%; "  >
<div align="center" style="padding-top:25px;"><img src="images/ccave-logo.png" alt="alt" /></div>

<div style="margin-top:93px; font-size:12px; font-family:Arial, Helvetica, sans-serif; color:#0099FF;" align="center">

    <asp:ImageButton ID="ImageButton1" runat="server" 
        ImageUrl="~/images/cancel.jpg" onclick="ImageButton1_Click" />
</div>
</div>
<div style="margin-top:93px; font-size:12px; font-family:Arial, Helvetica, sans-serif; color:#0099FF;" align="center">
<asp:GridView ID="GridView1" runat="server" AutoGenerateColumns="False" 
    CellPadding="2" CellSpacing="2" CssClass="Normal" BorderColor="#003300" 
    Font-Bold="True" ForeColor="#FF0066" >
                    <Columns>                                 
                             
                        <asp:TemplateField HeaderText="Order ID" Visible="False">
                            <ItemTemplate>
                                <asp:Label ID="lblOrderID" runat="server" Visible="False" Text='<%# Bind("ShoppingCartRecID") %>'
                                    CssClass="Normal"></asp:Label>
                            </ItemTemplate>
                        </asp:TemplateField>                        
                        <asp:TemplateField HeaderText="CustomerID" SortExpression="CustomerID">
                            <ItemStyle />
                            <ItemTemplate>
                <asp:Label ID="lblCustomerID" runat="server" Text='<%# Bind("CustomerID") %>' CssClass="Normal"></asp:Label>
           </ItemTemplate>
                           </asp:TemplateField>                        
                        <asp:TemplateField HeaderText="Customer Name" SortExpression="Customer Name">
                            <ItemStyle />
                            <ItemTemplate>
                <asp:Label ID="lblEmployeeID" runat="server" Text='<%# Bind("Cust_Name") %>' CssClass="Normal"></asp:Label>
                </ItemTemplate>
                          </asp:TemplateField>                        
                        <asp:TemplateField HeaderText="Email" SortExpression="Email">
                            <ItemStyle />
                            <ItemTemplate>  
                <asp:Label ID="lblOrderDate" runat="server" Text='<%# Bind("Email") %>' CssClass="Normal"></asp:Label>                 
                </ItemTemplate>
                          
                        </asp:TemplateField>                        
                        <asp:TemplateField HeaderText="Product Name" SortExpression="Product Name">
                            <ItemStyle />
                            <ItemTemplate>  
                <asp:Label ID="lblRequiredDate" runat="server" Text='<%# Bind("Name") %>' CssClass="Normal"></asp:Label>                 
                </ItemTemplate>
                          
                        </asp:TemplateField>                        
                        <asp:TemplateField HeaderText="Quantity" SortExpression="Quantity">
                            <ItemStyle />
                            <ItemTemplate>  
                <asp:Label ID="lblShippedDate" runat="server" Text='<%# Bind("Quantity") %>' CssClass="Normal"></asp:Label>                 
                </ItemTemplate>
                          
                        </asp:TemplateField>                        
                        <asp:TemplateField HeaderImageUrl="images/symbol21.jpg" SortExpression="Price" >
                            <ItemStyle />
                            <ItemTemplate>
                <asp:Label ID="lblShipVia" runat="server" Text='<%# Bind("totalprice") %>' CssClass="Normal"></asp:Label>
                </ItemTemplate>
                         
                        </asp:TemplateField>                        
                          
                    </Columns>
                    <HeaderStyle ForeColor="#003300" />
                    <PagerStyle HorizontalAlign="Left"/>
                    <SelectedRowStyle ForeColor="#660033" />
                </asp:GridView>

</div>
<div>
   </div>
</form>
<br /><br />
<div align="center">
    <form action="https://www.ccavenue.com/sdsdsd/cc_details.jsp" method="post">
    
   <div>
 

        <input type="hidden" name="Order_Id" id="Order_Id"  value="Order_Id" runat="server"/>
            <input  type="hidden" name="Amount" id="Amount" value="AMOUNT" runat="server"/>
            <input type="hidden"name="Merchant_Id" id="Merchant_Id" value=" add your  Merchant ID"/>
            <input id="Hidden1" type="hidden" name="Redirect_Url" value="redirect url" runat="server" />
            <input type="hidden" name="billing_cust_name" id="billing_cust_name" value="" runat="server"/> 
            <input type="hidden" name="billing_cust_address" id="billing_cust_address" value="" runat="server"/> 
            <input type="hidden" name="billing_cust_country" id="billing_cust_country" value="" runat="server"/> 
            <input type="hidden" name="billing_cust_tel" id="billing_cust_tel" value="" runat="server"/> 
            <input type="hidden" name="billing_cust_email" id="billing_cust_email" value="" runat="server"/> 
            <input type="hidden" name="billing_zip_code" id="billing_zip_code"  value="" runat="server"/> 
            <input type="hidden" name="billing_cust_state" id="billing_cust_state" value="" runat="server"/> 
            <input type="hidden" name="billing_cust_city" id="billing_cust_city" value="" runat="server"/> 
            <input type="hidden" name="billing_cust_notes" id="billing_cust_notes" value="" runat="server"/> 
            <input type="hidden" name="delivery_cust_name" id="delivery_cust_name" value="" runat="server"/> 
            <input type="hidden" name="delivery_cust_address" id="delivery_cust_address" value="" runat="server"/> 
            <input type="hidden" name="delivery_cust_tel" id="delivery_cust_tel" value="" runat="server"/> 
            <input type="hidden" name="delivery_zip_code" id="delivery_zip_code" value="" runat="server"/> 
            <input type="hidden" name="delivery_cust_state" id="delivery_cust_state" value="" runat="server"/> 
            <input type="hidden" name="delivery_cust_city" id="delivery_cust_city" value="" runat="server"  /> 
            <input  type="image" src="images/submit.jpg" >
    </div>
    
    </form>
    </div>
    
</body>
</html>


In the Coding Part  i  have to set the Values 

so i have set the values like that


 string   NetPrice = Convert.ToString (Session["ashish"]);
        string custid = Convert.ToString(Session["name"]);
       SqlConnection con = new SqlConnection();
       con.ConnectionString = ConfigurationManager.AppSettings["DBConn"];
       con.Open();
       SqlCommand cmd = new SqlCommand();
       cmd.CommandText = "insert into tbtemp values(" + NetPrice + "," + custid + ")";
       cmd.Connection = con;
       cmd.ExecuteNonQuery();
       cmd.Dispose();
        SqlDataAdapter adp = new SqlDataAdapter("dbo.ashish", con);
        adp.SelectCommand.CommandType = CommandType.StoredProcedure;
        adp.SelectCommand.Parameters.Add("@CustomerID", SqlDbType.Int).Value = Session["name"];

        DataSet ds = new DataSet();

        adp.Fill(ds);
              GridView1.DataSource = ds;
        GridView1.DataBind();


        string Merchant_Id, Amountamt, Order, Redirect_Url, WorkingKey, intChecksum;
        Merchant_Id = "Merchant id given by CCAvenue";
        Order = ds.Tables[0].Rows[0]["ShoppingCartRecID"].ToString();
        Amountamt = NetPrice.ToString();
        Redirect_Url = "Redirect url from ccavenue to your website";
        WorkingKey = "2nye4orvbc7glrplb9";
        intChecksum = myUtility.getchecksum(Merchant_Id, Order, Amountamt, Redirect_Url, WorkingKey);


        Order_Id.Attributes["value"] = intChecksum;
        Amount.Attributes["value"] = ds.Tables[0].Rows[0]["netprice"].ToString();
        billing_cust_name.Attributes["value"] = ds.Tables[0].Rows[0]["Cust_Name"].ToString();
        billing_cust_address.Attributes["value"] = ds.Tables[0].Rows[0]["Address1"].ToString();
        billing_cust_country.Attributes["value"] = ds.Tables[0].Rows[0]["Country"].ToString();
        billing_cust_tel.Attributes["value"] = ds.Tables[0].Rows[0]["Phone"].ToString();
        billing_cust_email.Attributes["value"] = ds.Tables[0].Rows[0]["Email"].ToString();
        billing_zip_code.Attributes["value"] = ds.Tables[0].Rows[0]["Zip"].ToString();
        billing_cust_state.Attributes["value"] = ds.Tables[0].Rows[0]["State"].ToString();
        billing_cust_city.Attributes["value"] = ds.Tables[0].Rows[0]["City"].ToString();
        billing_cust_notes.Attributes["value"] = ds.Tables[0].Rows[0]["Notes"].ToString();
        delivery_cust_name.Attributes["value"] = ds.Tables[0].Rows[0]["Cust_Name"].ToString();
        delivery_cust_address.Attributes["value"] = ds.Tables[0].Rows[0]["Address2"].ToString();
        delivery_cust_tel.Attributes["value"] = ds.Tables[0].Rows[0]["Phone"].ToString();
        delivery_zip_code.Attributes["value"] = ds.Tables[0].Rows[0]["Zip"].ToString();
        delivery_cust_state.Attributes["value"] = ds.Tables[0].Rows[0]["State"].ToString();
        delivery_cust_city.Attributes["value"] = ds.Tables[0].Rows[0]["City"].ToString();

Comparision of string value in asp.net


I have some to do some comarison onthe text file  so i display the TEXT file into the textbox and second TEXT file in to the Second Textbox  and afetr that i compare both file         


string testString1 = TextBox1.Text.ToString();
        string testString2 = TextBox2.Text.ToString();
        int result = string.Compare(testString1, testString2);
        Label1.Text = result.ToString(); 

adding CSS file dynamically


call this Feature on the button event

where font size will be increased or decresed  using upon the Style sheet

System.Web.UI.HtmlControls.HtmlLink link = new System.Web.UI.HtmlControls.HtmlLink();
        link.Href = "~Styles/Site.css";
        link.Attributes.Add("rel", "stylesheet");
        link.Attributes.Add("type", "text/css");
        This.Controls.Add(link);